
A simple backyard project that encourages creativity, messy play, and surprisingly long attention spans
A few years ago, outdoor mud kitchens started showing up everywhere on Pinterest. Tiny pots. Wooden counters. Kids making “soup” out of dirt and leaves like miniature forest chefs.
At first, I assumed it was another parenting trend that looked better in photos than real life.
Then I built one.
What surprised me wasn’t how cute it looked. It was how often it got used. Kids who normally bounced between activities suddenly spent an hour “cooking” with sticks, water, flower petals, and old measuring cups.
The best part? Building a mud kitchen is much easier than most backyard DIY projects. You don’t need perfect carpentry skills, expensive lumber, or a giant outdoor space.
You mostly need a sturdy surface, a little creativity, and a willingness to let things get messy.
What Exactly Is a Mud Kitchen?
A mud kitchen is basically an outdoor play kitchen made for dirt, water, sand, leaves, and whatever else kids decide belongs in a five-star imaginary restaurant.
Some are elaborate with sinks, shelves, and chalkboard menus. Others are little more than a wooden bench with a bowl and a few old pans.
Both work.
Children care far less about aesthetics than adults do. If there’s water, containers, and permission to make a mess, they’re usually happy.
That’s worth remembering before spending hundreds of dollars trying to build the “perfect” setup.
Start With the Right Location
This matters more than most people think.
Choose a spot that can handle water and mud without becoming a disaster zone. Near a garden hose is ideal. Partial shade also helps because direct sun can turn the area into a hot, dry patch pretty quickly.
If possible, place the kitchen near natural materials kids can use in their play:
- Dirt
- Small rocks
- Leaves
- Flowers
- Grass clippings
These become “ingredients” almost immediately.
You’ll also want a surface underneath that drains reasonably well. Gravel, mulch, or grass usually works better than a patio that turns slippery.
The Simplest Build Method
You do not need to build cabinetry from scratch unless you genuinely enjoy woodworking.
One of the easiest approaches is repurposing old furniture:
- An unused TV stand
- A small wooden table
- A low bookshelf
- Wooden pallets
Old pallets are especially popular because they already have a rustic outdoor look and cost very little — sometimes free.
The basic structure only needs three things:
- A countertop or work surface
- Storage space for bowls and utensils
- Stability so it doesn’t wobble during play
That’s it.
If you want to make it feel more like a “real” kitchen, add hooks for utensils or a shelf for containers. But don’t get stuck over-designing it.
Kids are incredibly good at turning simple objects into imaginative play environments.
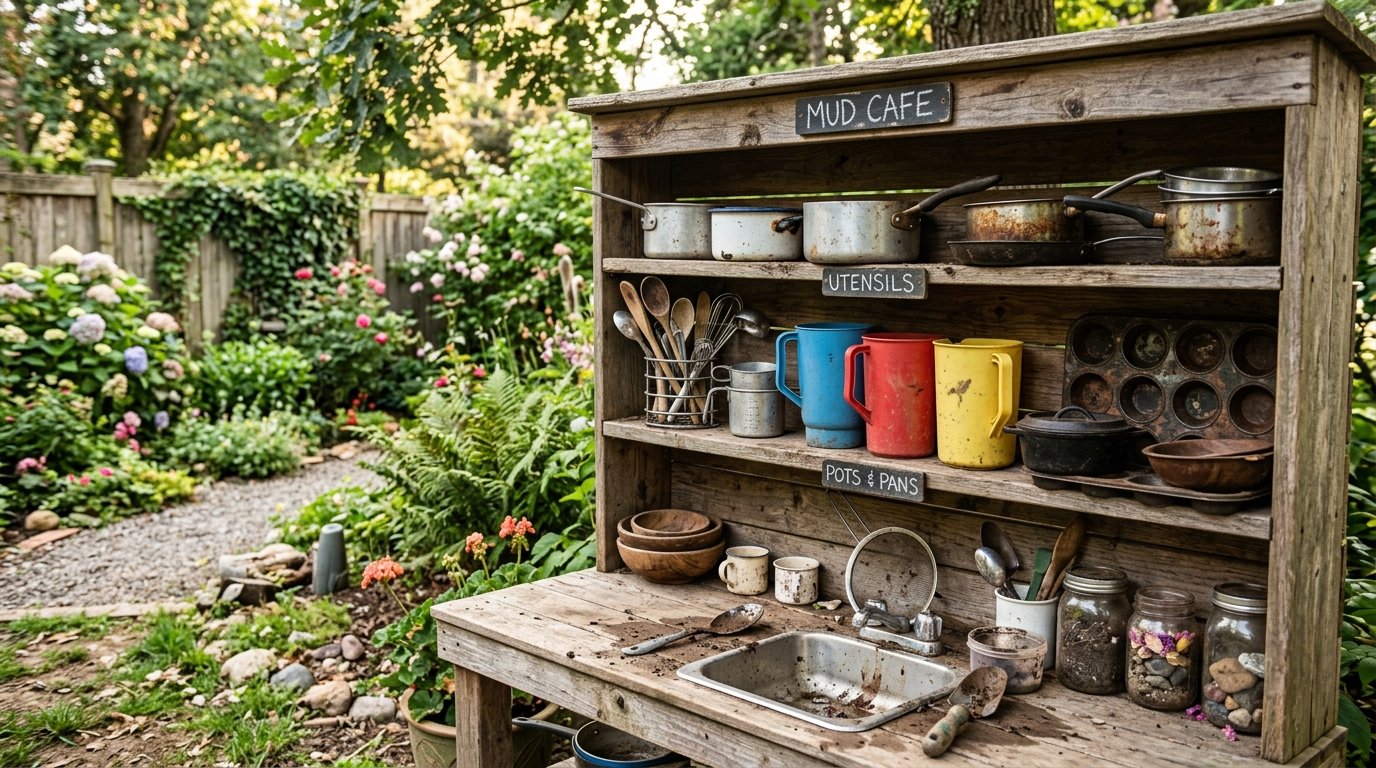
Adding a Sink Makes a Huge Difference
If there’s one upgrade worth doing, it’s this.
You can create a pretend sink by placing a metal mixing bowl or plastic tub into a hole cut into the countertop. It doesn’t need plumbing. Even a removable basin works perfectly.
Water changes everything.
Once water enters the equation, kids start mixing, pouring, scooping, and experimenting for much longer periods of time. Mud kitchens become part science lab, part bakery, part potion shop.
A simple water dispenser or bucket nearby is usually enough.
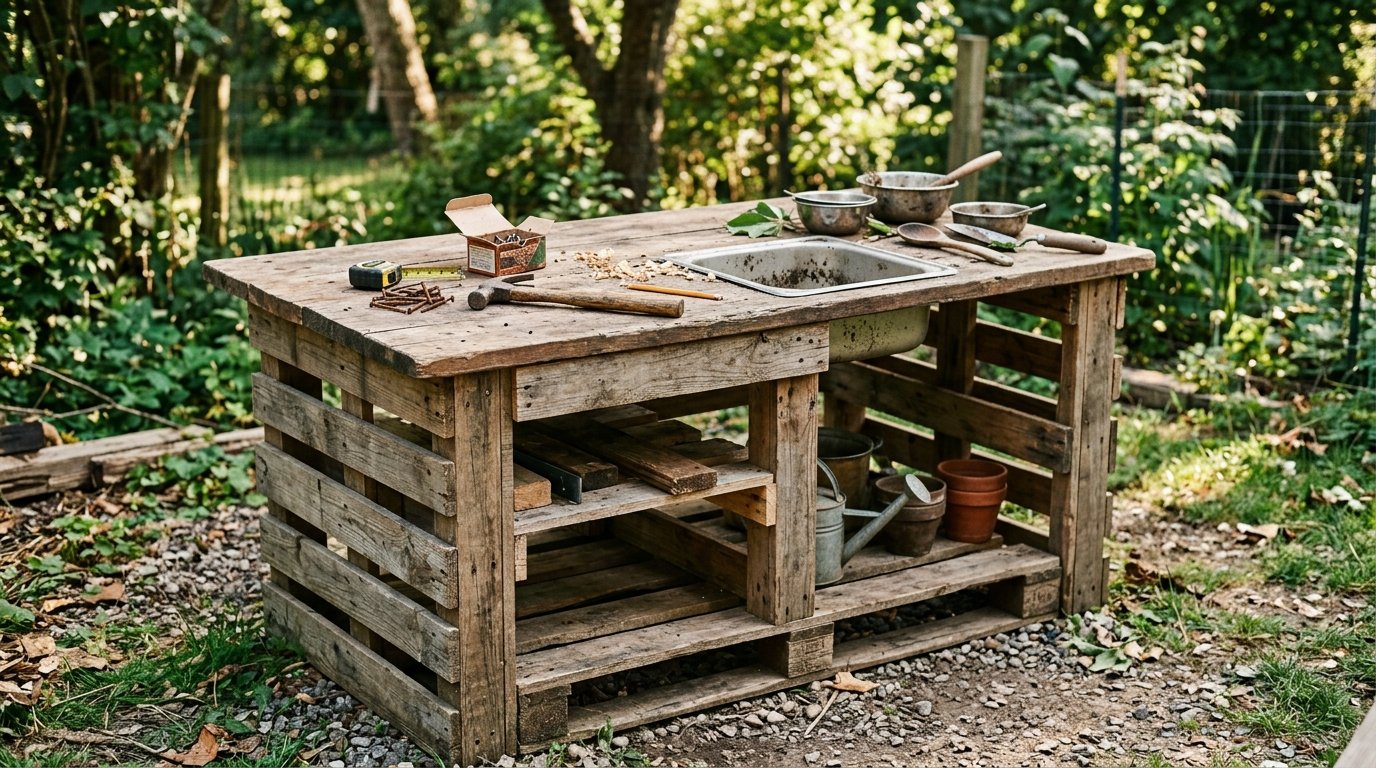
Use Real Kitchen Tools — Just Not Your Good Ones
One reason mud kitchens feel so engaging is because kids get to use objects that resemble real-life tools.
You’d be surprised how exciting old measuring spoons can become outdoors.
Good options include:
- Old pots and pans
- Wooden spoons
- Muffin tins
- Plastic pitchers
- Measuring cups
- Colanders
Thrift stores are excellent for this. You can often build the entire accessory collection for the price of a coffee.
Avoid anything fragile or sharp, obviously, but most kitchen odds and ends work surprisingly well.
Don’t Worry Too Much About Perfection
This is where many DIY projects quietly become stressful.
People start comparing their backyard setup to heavily staged Pinterest photos with matching cookware and custom paint.
Real mud kitchens rarely stay neat for long.
They become muddy. Water spills everywhere. Leaves end up in bowls. Random sticks appear in strange places. That’s the point.
Children tend to remember freedom and playfulness more than polished design details.
In fact, some of the best outdoor setups look slightly unfinished because they evolve over time. You add a shelf later. Maybe a chalkboard. Maybe a rain barrel.
The kitchen grows with how it gets used.
A Few Small Upgrades That Help
After building one, there are a few additions I’d recommend from the start:
- Add hooks for hanging tools
- Use outdoor-safe wood stain or sealant
- Include a small container for clean water
- Keep a towel nearby for quick cleanup
None of these are essential, but they make the setup easier to maintain.
And maintenance does matter. Outdoor projects last much longer when the materials can handle rain and sun without falling apart after one season.
Steps to Build a Mud Kitchen
The good news is you don’t need advanced woodworking skills or a massive backyard to build one. Most mud kitchens are surprisingly simple.
Step 1: Choose the Right Spot
Start by finding a space that can handle water and mess comfortably. Near a garden hose is ideal because kids use far more water than you expect once the “cooking” begins. Partial shade also helps. Full afternoon sun can dry everything out quickly and make the area uncomfortable during warmer months. If possible, place the kitchen near natural materials like dirt, grass, flower petals, or small rocks. Kids naturally collect these as ingredients during play. You’re essentially creating a small outdoor workspace where being messy is part of the experience.
Step 2: Build the Base
This is the part many people overcomplicate. You do not need custom cabinetry or expensive lumber. Some of the best mud kitchens are made from repurposed furniture:
- Old wooden tables
- TV stands
- Small shelving units
- Wooden pallets
The structure only needs to be sturdy enough for mixing, pouring, and climbing-resistant play. A countertop surface is the main priority. Storage underneath is helpful for bowls, pots, and utensils, but it doesn’t need to look perfect. Outdoor projects that feel a little rustic often age better anyway.
Step 3: Add a Sink Area
A sink instantly makes the kitchen feel more interactive. The easiest method is cutting a hole into the countertop and dropping in a metal bowl or plastic tub. No plumbing required. Even a removable washing basin works well.
Water changes the entire experience because it allows children to stir, pour, and create actual mud instead of dry dirt mixtures that lose their appeal after five minutes.
If cutting into wood sounds intimidating, simply placing a bucket or bowl on top works fine too.
Step 4: Collect Old Kitchen Tools
This part is usually the most fun. Raid your kitchen drawers for old utensils you no longer use, or visit a thrift store. Children love using “real” objects outdoors because it feels more authentic than plastic toy sets.
You’ll quickly notice that kids invent uses for things adults never would. A muffin tray becomes a mud cupcake station. A colander becomes a leaf washer. The less structured the setup feels, the more creative the play tends to become.
Step 5: Make It Weather-Friendly
Outdoor mud kitchens go through a lot. Rain, sun, dirt, and constant water exposure can wear materials down quickly, so adding a simple weatherproof sealant to wood helps extend the life of the project.
Hooks for hanging utensils are also worth adding early on. Otherwise, everything somehow ends up scattered across the yard within days.
You don’t need a perfectly styled Pinterest setup. In fact, the kitchens that get used most often usually look slightly chaotic.
Why Mud Kitchens Work So Well
There’s something refreshing about play that doesn’t involve batteries, screens, or instructions.
Mud kitchens are open-ended. Kids invent their own games, recipes, and systems. One day it’s a bakery. The next day it’s a jungle café serving “leaf soup.”
That kind of imaginative play is harder to replicate with structured toys.
It also tends to hold attention longer because children stay in control of the activity.
If you enjoy simple backyard DIY projects, this is one of the few that consistently feels worth the effort.
And honestly, it doesn’t need to look perfect to become a favorite part of the yard.
If anything, the slightly messy version usually gets used the most.